


I love making and giving handmade creations. It is one of my favorite things to do! The smile I see when a recipient has received my handmade creation makes me all warm and fuzzy inside ☺. But making an interactive handmade creation – priceless. For your next event, whether it’s a birthday party, wedding, house warming, baby shower or anything that requires a card – try making this shaker. You’ll LOVE it – and they will too. Let’s get started!
Supplies:
- Cardstock Warehouse Cardstock Papers
- Razzle Berry
- Lemon Drop
- Blu Raspberry
- Gumdrop Green
- Gold Diamond Print Glitter
- Pure White
- Nesting Dies or Electronic Die Cutting Machine
-
Flower SVG files or Dies
- Circle/Oval Punch, Die or File Acetate
- Coordinating Sequin Mix
- Wet, Dry and Hot Adhesive
- Flower Shaping Tools
- Sentiment
Constructing the Base
I just started creating SVG files using my Silhouette Cameo. You can create your own design using your software or use nesting and small dies you have at home. I just added tiny hearts to a simple rectangle for an easy universal design. You could alternatively not use a design at all and just use a clear acetate window. Choose what works best for you.
I created the shape I wanted (rectangle) and the offset pieces to make my own “nesting” die set. You could do this with physical nesting dies. After I was set on the size (2 1⁄4 x 5 1⁄2) I cut out the 8 frame pieces in Pure White. (cut 1 piece in Razzle Berry – we’ll talk about that in a bit) Cut 2 pieces of acetate. I cut mine a little bigger than the rectangles. You can always cut off the excess.

Layer 6 of the frame piece on top of one another using wet glue. Be careful and work slowly to ensure nice even and crisp edges. Layer piece 7 and 8 each on a piece of acetate and set aside to dry. I like to use the “Lay it down and leave it alone” method. ☺ When dry – cut off the excess. Cut out your shaker design or card extra acetate piece.

It’s time to add the sequins mix. I love making mixes – they are just so fun to mix and match! Add one of your acetate layers to the shaker design (mine is the gold heart piece) and add the other acetate to the 6 piece “short stack” using wet glue. (not pancakes- hehe) Add your sequin mix to the base. Give it a little shake to see if you need to add or take away some of the mix.

Once you’re good to go and the sequins have settled to the bottom and not the edges, add the top acetate using wet glue. (the white frame on top will be changed to the Razzle Berry)

Once you’re done with the shaker base, you can now add the Razzle Berry frame piece to the top using wet glue.

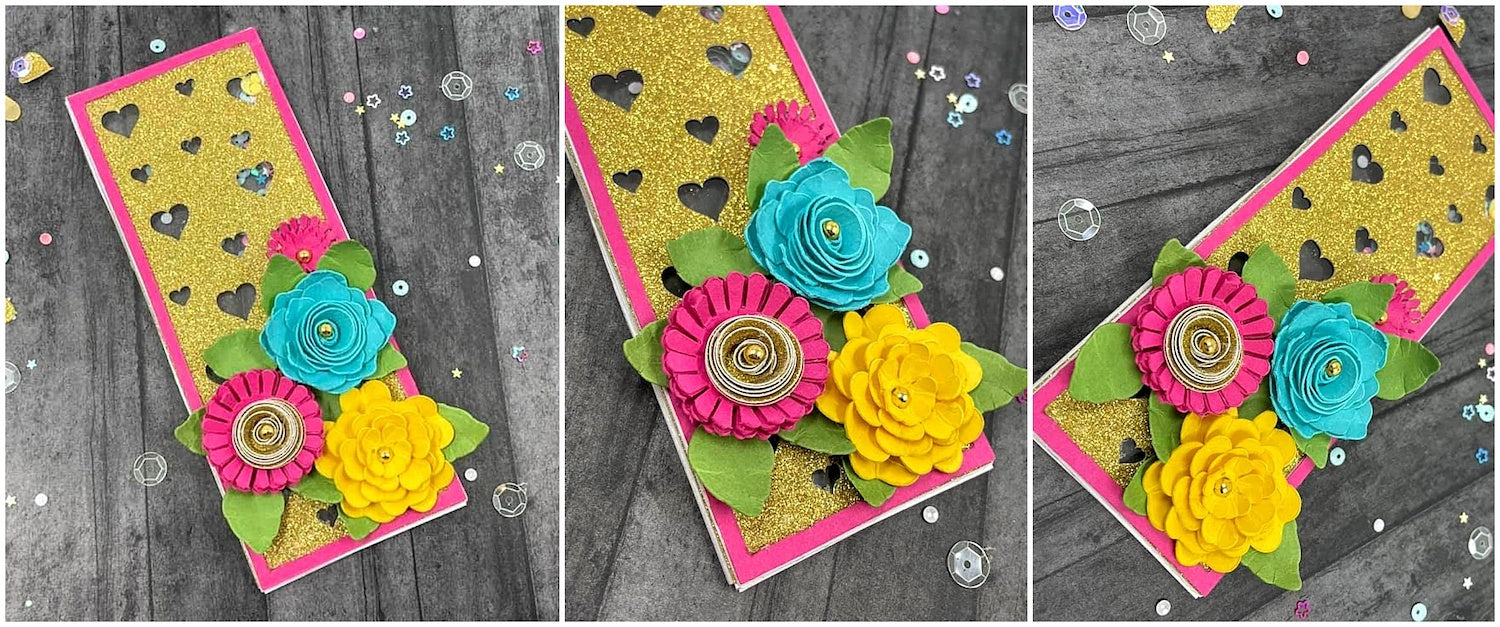
Now it’s time to add the mot satisfying part in my opinion – the paper flowers!! Ahh...just saying it brings me joy. I’m sure you will see more paper flowers from me in your near future, lol!

I used 3 different flower files from the Silhouette Online Store – choose the flower files or dies that make you smile. ☺ Use your flower tools to mold per the instructions for your particular files. Be sure to add variety in shapes and sizes. I cut my flowers in Gold Diamond Print, Razzle Berry, Lemon Drop, and the leaves are cut in Gumdrop Green.

Stagger your flowers as desired and hot glue them to the top of the shaker. Try to create some height differences and layers. Don’t forget those leaves – they are important too!
It just goes really quick from here. I’m sad to see you guys go. ☹ Now we will make the gift card holder. For the width, measure the base of your shaker and double that amount plus 1/4”. For the length, measure and add just 1/4” (I tried multiple ways of saying this – nothing seem grammatically correct..so here is a mathematical example)
If your shaker base is 2W x 4L (2 inches wide and 4 inches length), you would cut your card stock base (pure white) to 4 1⁄4 W x 4 1⁄4 L. So you’re doubling the width and adding 1⁄4” and KEEPING the length and adding 1⁄4”. Does that make sense? I surely hope so, otherwise this would just be in vain. *sigh*
In my case since my base was 2 1⁄4 x 5 1⁄2 I cut my card stock down to 5 x 5 3⁄4. Score on half. When folded it should be just 1⁄4” wider than your shaker. WHEW – let’s move right along...
Cut out two layering pieces for the inside of your gift card holder. I just cut mine down 1⁄4” smaller for both (2 3/8 X 5 5/8). Punch or cut out two small ovals or circles. This will keep your gift card in place. I used Razzle Berry and Gold Diamond Print for these.

I laid the gold paper on the front of the holder and the two Razzle berry pieces on the inside of the holder.

Add your gift card to one side – do not tape down. Add hot glue to JUST the bottom of the circle or oval and lay just UNDER the gift card at the bottom. Be careful not to touch the gift card with the hot glue.
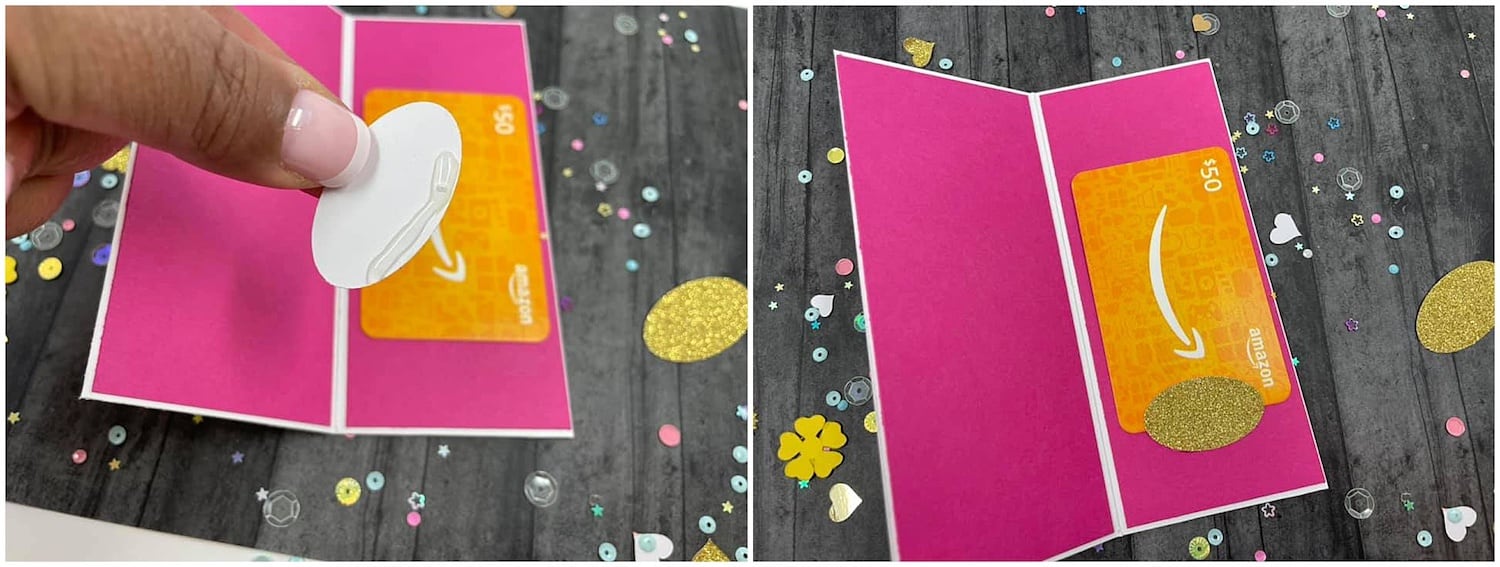
Repeat this step for the top.

Check to make sure your gift card can slide in and out easily.

Apply the shaker base to the top of the gift card holder using a good dry adhesive or wet glue. If using wet glue, be sure to stay just on the perimeter so the glue doesn’t show through the shaker. Lay something flat and heavy on it to ensure it holds.

Add a sentiment to finish your COOL CARD!
I hope you enjoyed my Shaker Gift Card tutorial and the pops of humor. I’ll leave you guys with some pictures of how mine turned out. Be sure to tag us on Facebook or Instagram with your shaker cards!! You can use hashtag #cardstockwarehouse to be featured on our page!

Toodles!
Tmika
YOUTUBE: Scrapdaworld
INSTAGRAM: @scrapdaworld
WEBSITE: Scrapdaworld
2 comments
Fabulous card! I love the colors!
Love your shaker gift card! The colors you used are soo bright and vibrant. This card is the perfect way to brighten someone’s day.