


Hi Friends! I can’t believe August is here! Today I’m going to show you how to make a super fun retro-y Fall sign. You can either put it on a door, wall, or even your mantle! Follow along as I show you how!
First, gather your supplies. We will be using the newest Cardstock Warehouse paper line!
SUPPLIES:
- Cardstock Warehouse Cardstock Papers
- Comoscio Woodstock 105lb
- Cipria Woodstock 105lb
- Terra Rossa Materica 92lb
- Blu Intenso Woodstock 92lb
- Verdigris Materica 92lb
- Pistacchio Woodstock 105lb
- Rainbow Holographic
- Sweet Tooth 12x12 Pop-Tone 100lb (optional)
- Foam Tape
Zig 2-Way Chisel Tip Glue Pen - Electronic Die-Cutting Machine
- Magnetic Frame (optional)

Begin by opening up your cutting program. I am using Cricut Design Space. I used the image “Fall Breeze & Autumn Leaves” (#M3C9D031C) and image “Autumn Flowers” (#M3C0634BC). I resized and changed colors as needed. For reference, my sign fits on a 8.5” x 11” paper. You can also find the entire Cricut project here.
Before cutting, make sure you add the offset layer for the phrase. This is optional but it makes it easier to add it to the sign, and allows you to add a cool holographic paper background.
Now you can cut your images! I used Blu Intenso, Terra Rossa, Comoscio, and Verdigris for the letters; Terra Rossa, Pistacchio, and Cipria for the flowers; Rainbow Holographic for the offset layer, and Verdigris for the leaves. I used an 8.5" x 11" sheet of Comoscio for the background. 
Next we can begin assembling our sign. I decided to start with the phrase. I took the offset image and adhered the letters using a Zig 2-Way Pen. Next, I added mounting tape to the backside to make it pop!
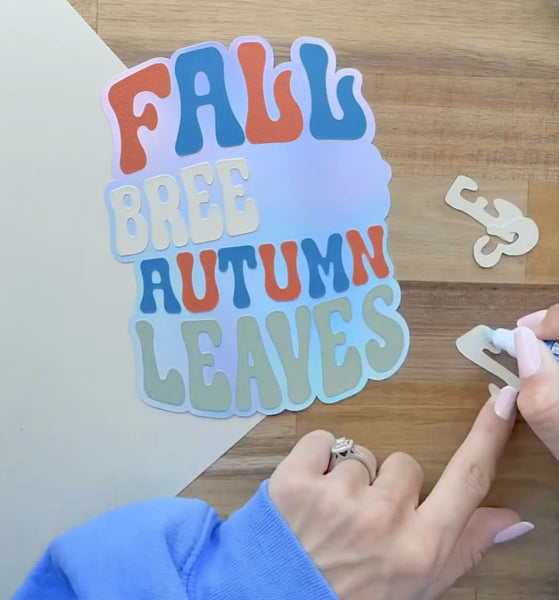
Then I began placing my flowers on the 8.5” x 11” paper. Once I liked how it looked, I took the offset phrase and placed it right in the center.
You can watch the whole assembly process on our Instagram page!
Next I added a 12” x 12” sheet of white to the back of the 8.5” x 11” sheet of Comoscio because my frame was larger than I thought. And there we have it! Here is our final project! 
Thanks for joining me! I hope you all were inspired to craft today!
Making your own? We'd love to see your creations! Show us your creations on Facebook or Instagram.
Happy Crafting and Happy Fall!
Kayla