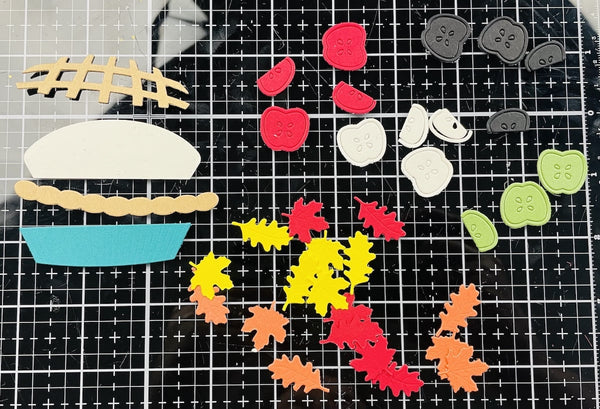
Hello crafty friends! Autumn is right around the corner and even though summer is my favorite season, I love the colors that the next season brings. So, I’ve created an Apple Pie card using beautiful Autumn colors.
Supplies:
- Cardstock Warehouse Cardstock Papers
- Madero Beach Speckletone 80lb
- Fairway Stardream Metallic 104lb
- Wild Cherry Pop-Tone 100lb
- Ebony Colorplan 100lb
- Limone Sirio Color 80lb
- Flame Stardream Metallic 104lb
- Paper Bag Kraft 100lb
- Marrs Green Colorplan 100lb
- Bright White Colorplan 100lb
- Spellbinders: Delicious Decorations, Perfect Pies
- Altenew: 3D Tree Bark Embossing Folder
- Tim Holtz: Gathered Twigs Distress Oxide Ink, Distress Glitter
- Glossy Accents Gel
- Bearly Arts Glue
- Simon Says Stamp: Ocean Ink
- Misti Stamping Tool
- Platinum 6 Die Cut Machine
First, I die-cut all of the pieces for the pie. I used the following colors for each piece.
- Apples - Madero Beach, Fairway, Wild Cherry and Ebony
- Pie - Madero Beach, Paper Bag and Marrs Green
- Leaves - Wild Cherry, Limone and Flame

Ink blending is a great way to add detail to an image. I used Antique Linen with a blender brush on the two pieces of pie crust, just a little around the edges. Then for the pie plate I used Ocean ink on the bottom.

Then I adhered the cute pie.

Using the Tree Bark embossing folder, I lightly sprayed a piece of Madero Beach cardstock with water and ran it through the die cut machine. Spraying the cardstock with water gives you a better embossed image. I trimmed down the panel slightly smaller than an A2 size.

Time to assemble the card. I adhered the background to a Bright White A2 card panel, then added the pie with foam tape for dimension. I added a few apples and then tucked the leaves around the apples. I had a sentiment in my stash so I added that to the card with foam tape.

I wanted to add a little detail to the pie and apples, so I used Glossy accents on the crust, then sprinkled on Distress Glitter. This will give the look of sugar on top of the pie. I also added glossy accents to the openings in the lattice to give the “apples” in the pie a shiny look. To finish off the look, I added Glossy Accents to the seeds and outside of the apples.

Here is what the final card looks like. I really love how it came out!

I hope you enjoyed this project! Making something crafty? We'd love to see your creations! Show us your creations on Facebook or Instagram. Tag your creations with #cardstockwarehouse to be featured in our stories!
Hugs, Joy Baldwin
Website: www.createitwithjoy.comIG: @createitwithjoy
FB: Create It With Joy


